- How to Create a Widget Designer using Thunder in Sitefinity
- How to test ACTITO APIs from PostMan
- How to integrate ACTITO API into Kentico 13 Xperience 13 Core MVC website
- Integrate Kentico Xperiecne 13 Core MVC with SSO using Azure AD B2C
- Create Blogs and Posts (Comments) in Sitefinity
- Kentico Hierarchical Transformation Layout
- How to assign global permissions to a user or role using permissions service in Sitefinity
- How to Create Custom widget in Sitefinity
- How to Create Custom widget using MVC Feather in Sitefinity
- How to Create Forms in Sitefinity
- How to Create Product types in E-commerce and its fields in Sitefinity
- How to Create Search index in Sitefinity
- How to Create Template and how to use it in Sitefinity
- How to implement Dynamic data retrieving in Sitefinity
- How to use Module Builder in Sitefinity
- IIS express configuration to host websites
- Unigrid
- UniPager
- UniSelector
- Making Responsive compatible on IE7/IE8 using response.js
- Client Side Compatibility issues on Macintosh
How to test ACTITO APIs from PostMan?
Introduction
Postman is a powerful API testing tool that allows you to interact with ACTITO's marketing automation platform. By using Postman, you can test and validate ACTITO APIs, ensuring seamless integration and accurate results. This guide will walk you through the process of testing ACTITO APIs using Postman, covering setup, request configuration, authentication, and response interpretation. With this knowledge, you'll be able to confidently test ACTITO APIs and ensure smooth integration into your marketing workflows.1. Generate Token-

Step 1: Open PostMan tool
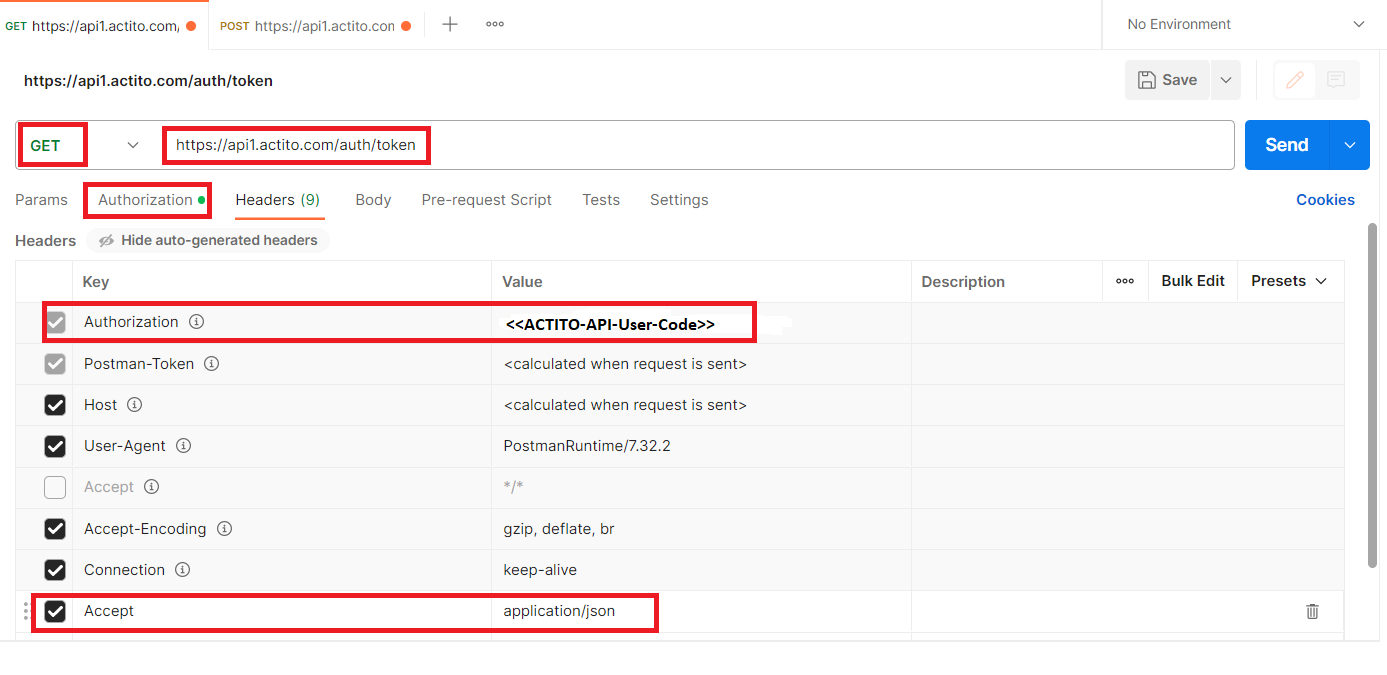
Step 2: Open New Tab and enter the API URL
Step 3: Select Method type is GET
Step 4: Add the following headers –
Authorization – You can add this from Authorization tab like Select API Key from Type Drop Down list and add the Key, Value and Add To fields.
Agent – You can add this from Headers tab
Screenshot –
Step 5: Click Send button and get the JSON response with accessToken like below – and pass this to profile API as a Bearer Token.
{

    "accessToken": "eyJ0eXAiOiJKV1QiLCJhbGciOiJSUzI1NiJ9.eyJhY2NvdW50SWQiOjEyLCJzdWIiOiIyMDcxMDIiLCJsaWNlbmNlSWQiOjIwNzEwMiwiaXNzIjoiYWN0aXRvIiwiYWNjZXNzUmlnaHRzIjpbIndyaXRlX2V4dGVybmkaW5ncyIsInJlYWRfc2NlbmFyaW9zIl0sInBvbCI6Im1haW5Qb2xpY3lBcGkiLCJleHAiOjE2ODY1NjE3MDAsImlhdCI6MTY4NjU2MDgwMCwianRpIjoiNDYifQ.LIdRa-fjG6s_2gdqelKNwb3aPNMLB4HmF9cnuvWeMvsGwAfJ5Z0j2zPCumy9ZX5fJq02qMy9x8ZNBkUYMu1VScGEIpVX0IUT1h0jm9jtYXDsGKgk4AUK4HiwXcWNeh1i- _UwaroXrZ-5H2v7sAg",

    "tokenType": "bearer",

    "expiresIn": "900s",

    "scope": "read write",

    "jti": "483f4d54-9f65-4891-ace9-c5984d7ba60c"

}
Note: You can use this accessToken to create/update Profile API and it will expire after 15min
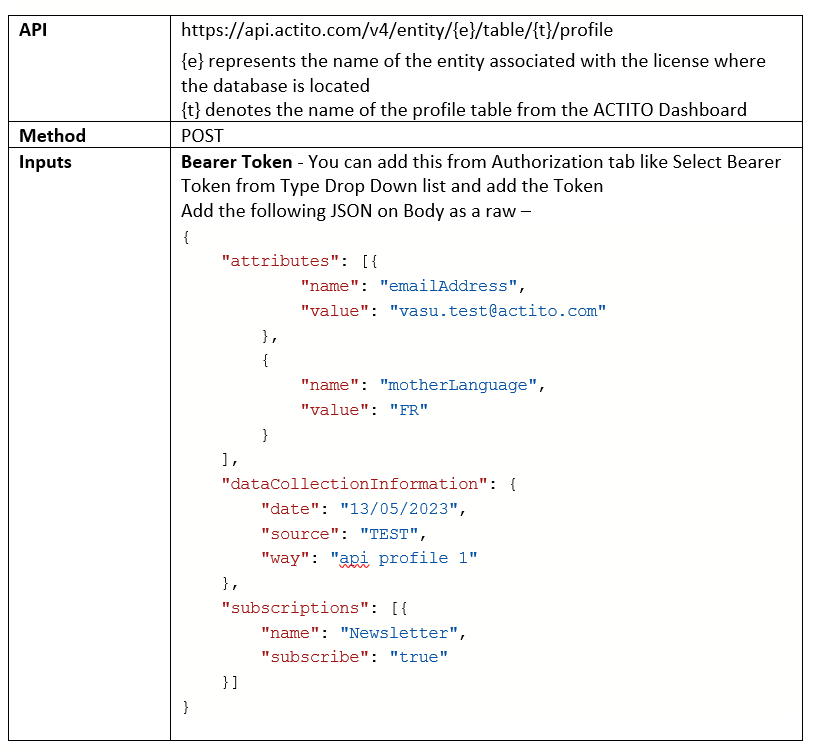
- Create / Update profile API

Step 1: Open PostMan tool
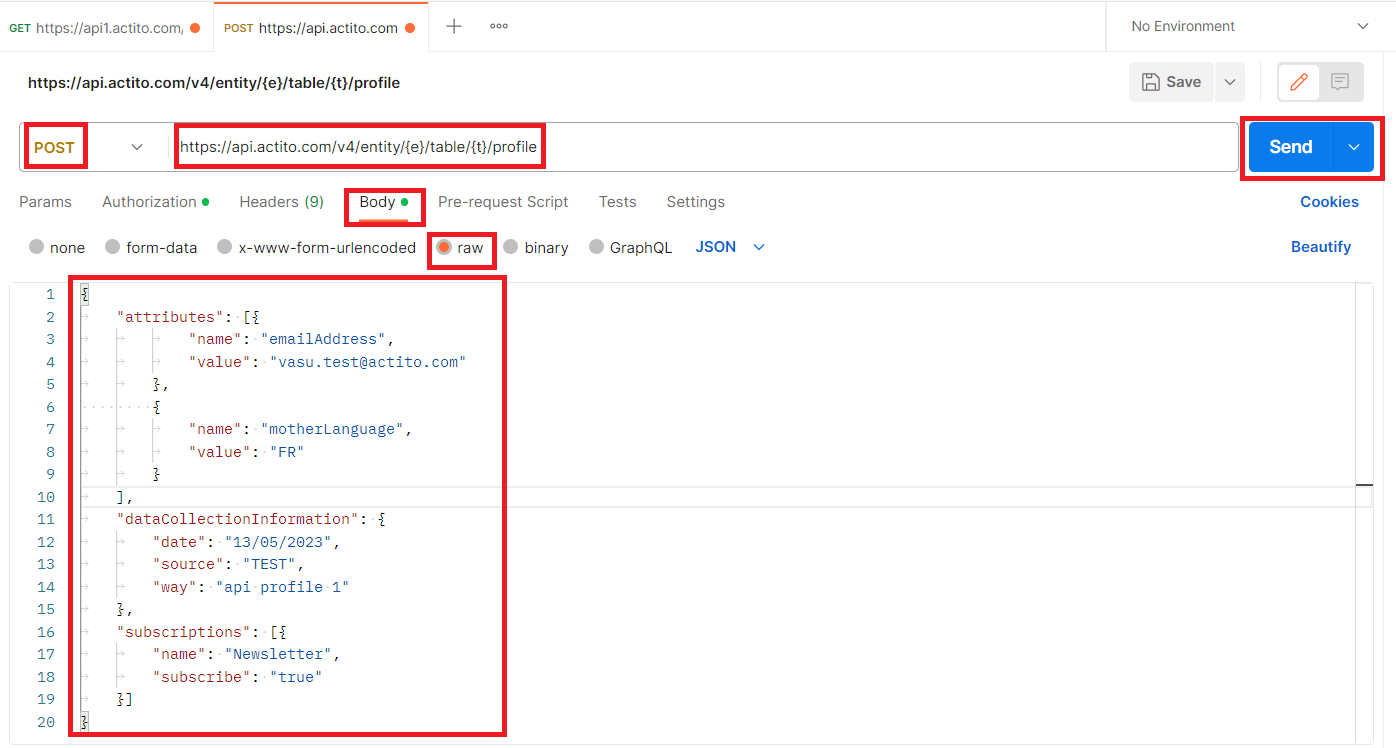
Step 2: Open New Tab and enter the API URL
Step 3: Select Method type is POST
Step 4: Add the following headers –
Bearer Token - You can add this from Authorization tab like Select Bearer Token from Type Drop Down list and add the Token
Input as Body –
{ |
Step 5: Click Send button and get the JSON response with profileID like below –
{

    "profileId": 143622

}
Screenshot –
We use cookies to provide the best possible browsing experience to you. By continuing to use our website, you agree to our Cookie Policy


