

Step-by-step procedure for installing Xperience, setting up project, configuring database, installing license, and configuring local hosting
.jpg?ext=.jpg)
Xperience by Kentico is a content and digital experience management system built on the .NET platform. For an overview of the system and its features, read our product introduction.
Before setup the project, you need to install Xperience project template package from nuGet.
Install Xperience project template
You can find the latest version of nuGet packages from the following
https://www.nuget.org/packages/Kentico.Xperience.Templates
Step 1: Go to command prompt or Terminal
Step 2: Run the following command
dotnet new -i kentico.xperience.templates

If you want to install a specific version of Xperience project templates, please use below command -
dotnet new --install Kentico.Xperience.Templates::<version number>Example -
dotnet new --install Kentico.Xperience.Templates::23.0.3Now you can get installed two project templates. One is Blank template and another one is sample site that is DancingGoat, it will demonstrates the content management and digital marketing features.
Templates Short names –
| Short name |
| kentico-xperience-mvc |
| kentico-xperience-sample-mvc |
Setup Project
You can use the above Template short names for setup project based on your requirement like, you can install sample site or install blank site.
Step 1: Go to command prompt or terminal
Step 2: Navigate to your desired location where you want create project
Step 3: Run the following command for sample site
dotnet new kentico-xperience-sample-mvc -n <Project Name>Example: dotnet new kentico-xperience-sample-mvc -n DancingGoat.Web
Step 4: Successfully created project and get the following

It will ask to you want install the database tools that is kentico-xperience-dbmanager for install database during this step and you can enter Y to complete this step.
Now time to install database. Before this you need to get the license . You will generate the license from client.kentico.com portal. Refer below screenshot; it is a 30-days validity.
Go to Evaluation keys option and generate localhost license. For more details about license click here

Setup DB with license
Before you can run an Xperience project, create a database and register a license key for the domain you want to use for your application in Xperience administration
First, get the license from client.ketnico.com portal and save it in a text file like (license.txt)
Step 1: Go to command prompt with your root directory where you setup your project
Step 2: Run the following command
dotnet kentico-xperience-dbmanager -- -s "<sql_server_name>" -a "<admin_password>" --hash-string-salt "<hash_string_salt>" --license-file "<license_file_path>" -d "databasename"If it is successfully created database then you can see the following result -

| Command | Purpose |
| -- | Add parameters after the -- syntax separator to pass the parameters directly to the kentico-xperience-dbmanager command and to avoid conflicts with general dotnet parameters. |
| -s | Set the -s parameter to your database server name. |
| -a | S et the -a parameter to the password you want to use for the default administrator account |
| --hash-string-salt | Set the --hash-string-salt parameter to the hash salt value for the Xperience instance |
| --license-file | Set the --license-file parameter to the path to a text file with the license key. This registers the license key in the Xperience administration |
| -d | Set –d parameter to create database with your desired name |
| --domain-name | Set the --domain-name parameter to the domain name where the installed site and its administration will run –Correct format:
|
| --content-culture | Set the --content-culture parameter to the site content default culture code in format languagecode2-country/regioncode2 (based on RFC 4646), for example, ja-JP. Defaults to English (United States) en-US when omitted |
Connects a database to your project via the
CMSConnectionString application setting (located in the project's appsettings.json file).Setup local hosting
You often need to build and test code changes quickly when developing websites. For this reason, it's helpful to have the site hosted locally on your machine. In this aspect, ASP.NET Core is very flexible, as it supports multiple hosting options.
We'll use the Kestrel web server to host our application for this tutorial. Kestrel is cross-platform and comes included by default with .NET installations. To launch the installed website, execute the following command in the directory where you created the project and installed its database:
Step 1: Go to command prompt with your root directory where you setup your project
Step 2: Run the following command
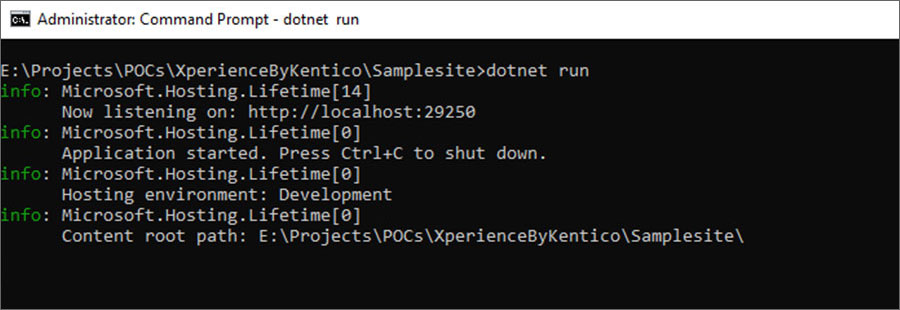
dotnet run
then you can see the following output –
.jpg "Command-prompt-dotnet-run-(1).jpg")
Enter the URL from the second line into your browser (e.g., http://localhost:29250, but with a different port number) to view the created site.

There's not much to see yet, but we'll get to that in the following steps. For now, you can take a look at the Xperience administration – add /admin to your site's URL and sign in using the default administrator account and the password you specified when installing the project database.

Xperience administration interface -
About Author:
.jpg)
Vasu Yerramsetti is a Solution Architect at Ray Business Technologies. He is a Kentico Xperience 13 Developer. Vasu is also a Certified Microsoft Specialist, Certified Kentico 12 Developer, Boomi Professional Developer and an expert in Agile Development methodology, specialized in CMS, WCMS, e-Commerce, Intranet, Marketing Automation, Performance Enhancements, on Kentico, Sitecore, Sitefinity and SharePoint.
Author's Kentico DevNet Profile